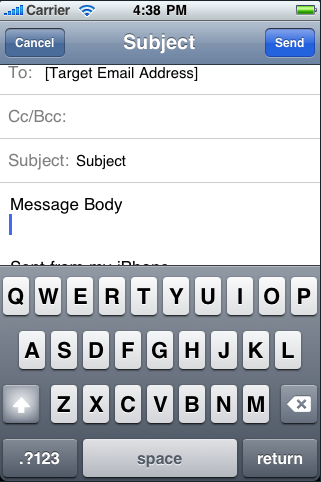
While I recently added the code snippets to my library for launching mail, websites and the phone app from within your iPhone application, this is not always an elegant solution. In certain use cases, the user will want to send an email from within your application and then continue with what they were originally doing - especially if you have a ‘mail to a friend’ button in your game or application.
Luckily, the iPhone OS 3.0 added this functionality. Quite excitingly, similar functionality for in-app SMS messages is coming soon (in iPhone OS 4.0), but we won’t talk about that here.
1. Referencing the MessageUI Framework
First up, we have to ensure that we are linking with the MessageUI Framework, which is the library that will provide the functionality we’re after. If you’ve not already got the MessageUI Framework referenced in your project, you’ll want to right click on ‘Frameworks’ in your projects ‘Groups & Files’ and select Add -> Existing Frameworks. Select MessageUI.framework and insert it into your project.
2. Call up the MFMailComposeViewController view like any other UIView
Next up you need to create and push to the main navigation controller a fresh MFMailComposeViewController. This will control the in-app email view that will allow the user to complete the remaining details for the email they wish to send and then either beam that email off to the lucky recipients across the internet, or to cancel the operation.

The example below shows how set a whole host of options on the mail compose view. You don’t have to set all of these - things like the Subject and the Recipients are optional, but you will more than likely want to set one or two of these depending on the view that is enabling the user to start a new email.
The code for this will often go in an IBAction method and is as follows
-(IBAction)sendEmail:(id)sender {
  // Create a new Mail Composer View Controller
  MFMailComposeViewController *mailViewController = [[MFMailComposeViewController alloc] init];
  mailViewController.mailComposeDelegate = self;

  // Optional Configuration Parameters to make life easier for the user
  [mailViewController setSubject:@"Subject"];
  [mailViewController setMessageBody:@"Message Body" isHTML:NO];
  [mailViewController setToRecipients:[NSArray arrayWithObject:@"a@b.com"]];
  [mailViewController setCcRecipients:[NSArray arrayWithObject:@"a@b.com"]];
  [mailViewController setBccRecipients:[NSArray arrayWithObject:@"a@b.com"]];

  // Present the VIew Controller and clean up after ourselves
  [self presentModalViewController:mailViewController animated:YES];
  [mailViewController release];
}
Now, we’ve got an application that shows a compose email view ready for the user to send an email direct from your app. However, there’s one main problem with the app as it stands - once you’ve launched the mail compose view, it’ll never go away! In order for you to respond when the user has (or hasn’t) sent an email, and to optionally respond with your own messages depending on whether it worked or not, you’ll have to implement the MFMailComposeViewControllerDelegate protocol.
3. Implementing the MFMailComposeViewControllerDelegate Protocol
The third and final step in getting your in app Mail Composer working correctly is to respond to the appropriate delegate protocol. I often find that implementing delegate protocol methods can sometimes be a laborious task - but you’re in luck this time, as there is only one method that you have to worry about;
-(void)mailComposeController:(MFMailComposeViewController*)controller didFinishWithResult:(MFMailComposeResult)result error:(NSError*)error
{
  if ( result == MFMailComposeResultFailed )
  {
    // Sending failed - display an error message to the user.
    NSString* message = [NSString stringWithFormat:@"Error sending email '%@'. Please try again, or cancel the operation.", [error localizedDescription]];
    UIAlertView* alertView = [[UIAlertView alloc] initWithTitle:@"Error Sending Email" message:message delegate:nil cancelButtonTitle:@"Ok" otherButtonTitles:nil];
    [alertView show];
  }
  else
  {
    // If we got here - everything should have gone as the user wanted - dismiss the modal view.
    [self dismissModalViewControllerAnimated:YES];
  }
}
There you have it - 3 easy steps to implementing the MFMailComposeViewController in your iPhone application.

